
Until now, “whoosh effects” (or “the sound of something going past you”) have been made by hand (or by some internal software) which meant that one would have to spend hours or even days making them. In the past there were a few tools that let you simulate the Doppler Effect but none really created a proper “whoosh” sound. You`d still need a chain of processes that helped you sell the proper effect. Now we’ve got two “whoosh making” applications that will help sound designers in this very area.
“Whoosh”, developed by Meltedsounds (branch of TONSTURM), is a Reactor (5.8 and up) based patch which lets you create various pass bys etc. using a custom built Doppler Effect. “WaveWarper”, developed by SoundMorph(which is Max based standalone application), uses a sort of a different technique to make these sounds.
“Whoosh” comes packed with various samples by great sound designers such as JedSounds, Tim Prebble, Tonsturm, Chuck Russom FX, Hart FX and many others. By default you are limited to using these samples and that might be a deal breaker for some, however since this is a Reaktor patch, with a little hacking you can load your own samples. MeltedSounds also made a video tutorial on how to load your sounds into “Whoosh”. The down side of loading your own sounds is that the predefined categories will not change. So, for example, you load various “Splatter” sounds (going to extreme here) but the “Whoosh” category would still be a predefined category e.g. “Animals, Water, etc.”
Another downside (since we started with that) is that this is a Reaktor based patch and you will need a full version of Reaktor 5.8 to fully use “Whoosh” as it will not work with Reaktor Player. A lack of documentation would also be a minus since there is none. All you get is a “Read me” file with a link to the overview of “Whoosh”. I think that was a poor choice on the developer’s side and would probably be wiser if they included the video right in the folder “Whoosh” comes in (just a personal opinion and not a major deal breaker).
Now, that we got that out of our hands let talk about the good stuff.
The samplers
 There are four main samplers plus an individual sampler for impact sounds. Each of the four samplers contains two play modes. You could either start with a “Loop” mode or a “Granular” mode. “Loop” like “Granular” mode has three types of playing the sound: forward, alternative and reverse. In the loop mode you can set the length of the loop, volume, pitch and pan, exactly what you would need in a simple loop player. “Granular” mode however lets you choose between easy and pro granular modes and adds additional controls such as grain, jitter, position, and density all of which can be automated. Like with “Loop” mode you can adjust the loop of the sample with the ability to change the grain size inside the desired loop.
All four samplers also share common low and high pass filters, categories from which you can select your sound, control to select the different sample from a category, solo and mute, fade and main volume control.
The developer made sure you will have plenty of content before deciding to use your own samples but please note that you cannot re-sell that sound even if modified, as suggested in the terms of use.
In addition to the four samplers you can also use additional impact sampler that as the name suggest holds all of your impact sounds. The impact sampler was a brilliant idea as it can be used for a much broader spectrum of sounds. With a little tuning and aligning you can create great impact sounds, explosions, hits, ricochets and much more. The impact sampler is also divided into four sub players which hold various samples in a set of three by three banks (banks are divided into A, B, C and D and each holds three samples) per one category.
The mentioned samplers are then routed to the main mixer which will again enable you to switch samples, categories and cross-fade between samplers and impact sampler. You also have a ducking option (process of automatically lowering “ducking” the volume of one track based on the level of another track) with few controls (attack, decay, hi-pass filter and look ahead). The impact sampler in the mix section can also be routed directly or through a main Doppler effect. I hope you can imagine now on how much time this tool saves while creating such effects.
The Doppler engine
 The fun part starts here. Every whoosh sound must, in my opinion consist of at least four elements which form the final effect. Volume control, Pan control, Pitch control and speed. Essentially every Doppler Effect does exactly that no matter who the developer is. Most of the Doppler effects that I have tested are ok but none comes close to “Whoosh” in terms of usability, control and output quality.
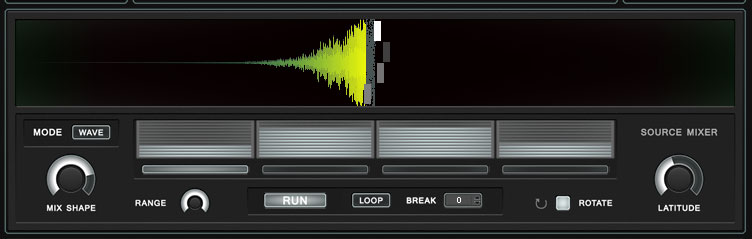
The Doppler Effect in “Whoosh” has two modes of playing the sound, “Wave” and “Random” both of which are pretty self explanatory. The “Wave” mode plays the sound in order (1-4) with the ability to control the curve and shape of the fade between the samplers, range which narrows the path of the sound and latitude (inertia of the wave mixer). I won’t go into details about “Random” mode as it does what it is supposed to do.
Next we take a look at Doppler engine at the top of the instrument. As mentioned the Doppler contains all of the needed parameters to create the motion of the sound. The main knob “duration” controls the speed and distance which are by default linked together and have a nice overview of the distance the sound will travel. Both speed and distance can be unlinked giving you more options to play with, however I found it best if they are linked together as it will give the best and, most importantly, accurate results. In addition you can also control the amplitude, pitch, damp and the pan of the sound for more realism.
The Doppler engine is then routed to a master volume control which has a limiter at the end of the effects chain. The limiter gives you three additional settings (crisp, firm and slow) on how the sound will be processed in the end. All of the settings are fairly similar (at least to me) with the exception of the firm setting which slightly tightens the sound giving you that nice “boom” or “kick” feel.
The Effects
 The effects section of the instrument is comprised of five different effects.
1. Mod delay – a simple delay that can be automated. Interesting thing about the delay is that it is set to max 80ms delay. The following options are available: Mix, Feedback, left and right delay, plus the option to link them or not if you desire. There are two LFOs that automate the movement of the delay.
2. Tremolo– two LFOs that control the stutter effect with two control parameters (Speed and Mix). Again both can be either synced or automated depending on your needs.
3. Equalize– You have four parameters that control low and high gain and the low and high frequency.
4. Drive– in my opinion are really good drive and saturation effect. Distortion and saturation level will not cause any unwanted artefacts whatsoever but it will give a nice, slightly warm tone to the sample. At least I haven’t managed to completely overdrive the sound. Only one effect can work at a time though which means you will have to decide which one to choose before finishing your sound. Both effects have one knob (“Drive”) which mixes the sound and a low cut filter.
5. Compress– It’s a compressor so I will not go into much detail here. You would find all of the needed options for compression here.
The GUI
 User interface is nice and clean and not as much frightening as any other Reaktor patch you have seen (think Newschool or Grain by Richard Devine). You will probably need a couple of hours to get to know it but I find that this is mainly because there is no documentation (although developers promised it in the future). If you are ever in doubt on what some parameter does you can always refer to a developer’s overview video of the instrument.
In the center of the instrument is nice representation of how the sound travels in a wave form. It can be a bit misleading at since there are four squares in the middle of it which control the way “Impact” sampler hits and you cannot change the position until you select the impact sampler. If you don’t select the impact sampler then you will control the fade of the sound (plus the duck though I am not too sure to be honest). Other than that I think the GUI is nicely represented and self explanatory.
Conclusion
The “Whoosh” in my opinion is a remarkable instrument and it solves many long hours of processing and melting the sound to create what it looks like a simple effect. It has plenty of content to keep you busy for some time but eventually you will want to move pass that and start using your own samples which can be (for now) a bit tricky if you don’t know how Reaktor works. I must say that the quality of personal samples makes a big difference on how the whoosh effect will be formed in the end. All of the needed effects are there and if you are familiar with them you will not have a hard time getting to know them. The lack of documentation sure is a minus in this case as some will probably want more details, though not a major setback.
If you don’t own a full version of Reaktor then you will be a little disappointed as it will not work in free “player” version of Reaktor. For those who do own a full version of Reaktor the price ($79) at which “Whoosh” is set it is definitely worth every penny.